

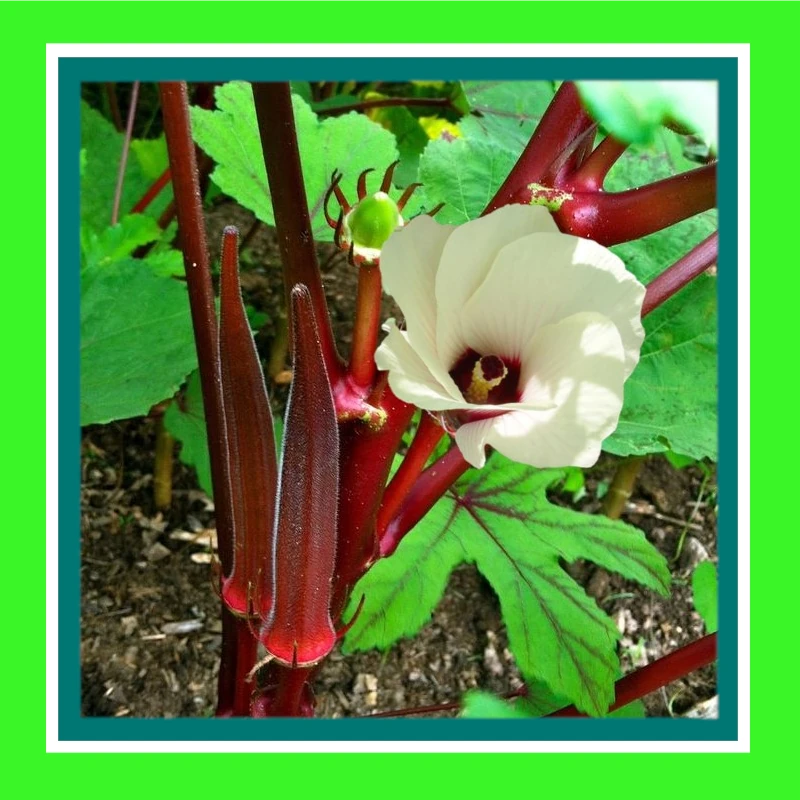
OKRA-RED BURGUNDY (SALE)
$3.50
Shipping and taxes calculated at checkout
Seeds per pack:
150
Abelmoschus esculentus
OKRA-RED BURGUNDY (SALE) a Torpedo-shaped red okra is 5 to 12cm long. The fresh taste is somewhere between eggplant & asparagus. When cooked, the red color disappears & the pods turn green. Magenta stems hold emerald green leaves & intense purple pods & canary yellow flowers with amber throats. The bushy okra grows 3-4' tall. These pods don't turn woody as quickly as other varieties. Red Burgundy okra is a heritage variety that is tender, delicious, & beautiful! The beautiful yellow flowers also have a red tinge to them. Growing up to 1.2m tall. the pads are best picked at 7-10 cm. Full maturity at 50-64 days.
SKU: OKRB-1
- Fast Australia-wide dispatch
- Secure checkout
- 30-day money-back guarantee
How to Grow Okra Red Burgendy
- Okra thrives in well-drained soil that is rich in organic matter. Prepare the soil by adding compost or well-rotted manure before planting. The ideal pH range for growing okra is between 6.0 to 6.8.
- Plant okra seeds directly into the garden after the danger of frost has passed. Space the seeds about 2-3 cm (1 inch) deep, with a distance of 30-45 cm (12-18 inches) between each seed. Or plant 7cm apart and thin out after germination. Alternatively, (& in cool climates) start the seeds indoors 4-6 weeks before the last frost and transplant outdoors after the last frost.
- Water consistently. Water deeply once or twice a week, depending on the weather conditions. It's important to water the plants at the base to avoid getting the foliage wet, as this can lead to fungal diseases.
- Fertilise regularly as Okra is a heavy feeder. Apply a balanced fertiliser, such as 10-10-10 or 12-12-12, every 4-6 weeks during the growing season. Alternatively, you can use organic fertilisers such as fish emulsion or compost tea.
- Control Pests and Disease with regular checks and remove any pests by hand or use an insecticidal soap. Red Burgundy Okra is relatively pest-resistant but can still fall victim to common okra pests such as aphids and stink bugs. Okra can also be susceptible to fungal diseases such as powdery mildew. To prevent this, avoid overhead watering and provide adequate air circulation around the plants.
- Harvest when the pods reach 7-10 cm (3-4 inches) in length. Harvest regularly, every 2-3 days, to encourage the plant to produce more pods. Use a pair of sharp scissors to cut the pods off the plant, being careful not to damage the stem or leaves.
Additional growing tips for Okra Red Burgendy
- Soak Seeds in Warm Tea Before Planting: Soaking okra seeds in warm chamomile tea or seaweed extract solution for 12–24 hours before planting helps soften the hard seed coat and promotes faster germination. Chamomile also has antifungal properties that help protect seedlings.
- Use Mycorrhizal Fungi at Planting: Adding mycorrhizal inoculants to the soil or seed hole improves nutrient uptake, especially phosphorus, which boosts root health and pod production. Okra responds well to these beneficial fungi, especially in organic gardens.
- Heat Boost with Black Plastic Mulch: To supercharge early growth, especially in cooler climates, lay down black plastic mulch before planting. It warms the soil, suppresses weeds, and conserves moisture, giving okra a head start in spring.
- Foliar Feeding for Explosive Growth: Supplement your soil fertilizing with biweekly foliar sprays of diluted seaweed or fish emulsion. Foliar feeding ensures trace minerals are delivered directly to the plant, stimulating more flowering and higher yields.
- Pinch the Tops for Bushier Plants: Once your okra plants reach about 30 cm (12 inches), pinch off the growing tip to encourage branching. More branches mean more flowers and pods. This also results in a compact plant that’s easier to harvest.
- Use Companion Plants for Pest Repellent Effect: Plant basil, nasturtium, or marigolds near your okra. These aromatic plants can deter aphids and stink bugs. Basil also improves pollinator activity, which indirectly supports okra flowering.
- Nighttime Harvest for Better Texture: Try harvesting okra early in the morning or after sunset when the plant is more hydrated. This can result in less fibrous pods and better texture, especially during hot summer days when the pods toughen quickly.
- Add Epsom Salt Sparingly: Sprinkle 1 tablespoon of Epsom salt (magnesium sulfate) per plant once a month around the base, especially if you notice pale leaves or poor pod set. Magnesium boosts chlorophyll production and flowering.
- Deep Water Soak Once a Week: Instead of frequent shallow watering, give okra a deep soak once per week, allowing water to penetrate at least 6–8 inches. This encourages deep root systems, making the plant more drought-resilient.
- Staggered Planting Every 2 Weeks: To extend your harvest, plant a new batch of seeds every 2–3 weeks for 6–8 weeks. This ensures continual pod production and prevents a glut or a dry spell in your harvest cycle.
Heritage of Okra Red Burgendy
Developed in 1983 by Leon Robbins of Clemson University in South Carolina, USA as part of a breeding program focused on diversity and ornamental appeal. Despite its university-based development, it was bred using traditional, non-GMO techniques, and is now prized for its deep burgundy-red pods and stems, which contrast beautifully with green foliage. These traits are both ornamental and functional — the pods retain flavor and tenderness when harvested early. Okra itself is of African origin, brought to the Americas via the transatlantic slave trade, where it became integral to African-American, Creole, and Southern U.S. cuisine. Red burgendy Okra is a relatively recent cultivar (not ancient), which has been adopted quickly into Southern heirloom gardening traditions blending ornamental beauty with deep cultural culinary roots.| Plant Height | 120 - 150 cm (4 - 5 feet) |
|---|---|
| Season of Interest | Summer to early Autumn |
| Temperature Range | 21 - 35°C (70 - 95°F) |
| Annual / Perennial / Biennial | Annual |
| Frost Hardy / Tender | Frost Tender |
| Sun Exposure | Full Sun |
| Sow Direct / Raise Seedlings | Sow direct / raise seedlings |
| Soil Type | Well-drained, loamy soil rich in compost |
| Soil pH | 6.0 - 7.0 |
| Soil Temperature | 21 - 30 °C (70 - 86 °F) |
| Seed Preparation | Soak seeds in warm water for 12 - 24 hours before planting |
| Sowing Depth | 1 - 2 cm (0.5 - 1 inch) |
| Plant Spacing | 30 - 45 cm (12 - 18 inches) |
| Row Spacing | 90 cm (36 inches) |
| Watering | Moderate |
| Germination Time (Days) | 7 - 14 days |
| Harvest Time (Days) | 55-65 days |
| Good Companion Plants | Peppers, Tomatoes, Cucumbers, Basil |
| Bad Companion Plants | None specific |
| Pests | Aphids, Flea Beetles, Stink Bugs |
| Diseases | Powdery mildew, Fusarium wilt, Root rot |
| Seeds per pack | 150 |
| Min temperature (C) | 21 |
| Max temperature (C) | 35 |

OKRA-RED BURGUNDY (SALE)
$3.50

More About Direct Compost Solutions
When I started this journey in 2009, I found nothing existed commercially, that was reasonably priced and easy to use. There was a homemade system which I also found was not that user-friendly.
Then a friend of mine told me about a homemade method she used. However, when I tried her method, I found this also didn't suit my needs, as it too had flaws that I considered where important. It did not keep vermin out, did not have a lockable lid and (to me) looked unsightly in the garden.
